Lightroom Retouching Time-lapse #3 - The Haji Ali Dargah | HDR Processing
Complete retouching workflow of 1 Hour in 2 minutes 45 seconds. Watch how HDR processing allows you to recover highlights and shadows to a massive extent.
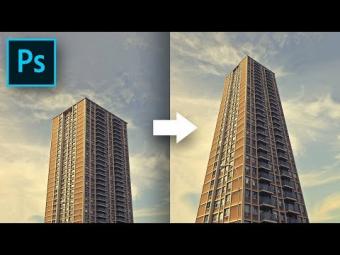
In this time lapse, I have used a lot of adjustment brushes in lightroom. Often while you are going for high contrast or you want to make your images pop up, more often than not, the main subjects which are in the shadow area will either go black, or the colors would look strange on them. At that point of time, you might want to use adjustment brushes specifically on that subject to recover the lost details and to make it look more natural.
So, in this particular workflow, firstly, I have merged three images of different exposures to give me the image with High Dynamic Range. The HDR processing is done in Lightroom itself. Then, I worked on the global adjustments. What I did differently in this image, is that I decreased the luminosity of blue to bring out more texture and details from the sky and the sea. I also increased the saturation of blue to complement the pop effect.
Next, I found that the Dargah and the boats had turned pretty dark. Specifically the dargah had also developed a blue color cast. So, to get rid of it, I used multiple adjustment brushes very heavily. I did increase the exposure and tried working with the highlights and shadows of that particular area. Also, I did apply the brushes into the areas that had turning too dark to show any details.
After that, to get even more details from the sky and the water, I used graduated filter. First graduated filter was applied in the sky to decrease the exposure to show the clouds. Then I added another graduated filter from the bottom to give the waters some dimension. Once satisfied with the results in Lightroom . I imported it directly into Photoshop. To know how to efficiently jump from Photoshop to Lightroom and back, refer this video: https://youtu.be/yM2m6nu3SY8
The sole purpose of jumping to Photoshop was to extract more details using the Color Efex Pro Plugin, which is a part of Nik Collection by Google. You can download them for free here: https://goo.gl/roqnZn
Now, I could have directly opened the standalone version of Color Efex Pro, but, Photoshop gave me the flexibility of selective applying the plugin. Also Photoshop lets you control the opacity or the percentage of effect of the plugin an a whole since, we often tend to get overboard with the effects. With Color Efex pro, I mostly applied Tonal contrast and detail extractor to the sky to make could more visible and dramatic. Then a little bit more effects from the Nik Collection here and there. That's it!
Hope this time lapse video helped you in some way or the other!
SUBSCRIBE: https://goo.gl/94umrc
ÖNERİLEN YAZILAR


YORUMLAR