Transform Dull Portrait to Excellent in Just 5 minutes - How to Get Most Out of Low Light Photos
In this video, learn how to edit your boring low light photos easily & quickly using Adjustment Brush tool in photoshop or lightroom. ►Download PSD file: http://photoshopdesire.com/boring-portrait-awesome-just-5-minutes-using-adjustment-brush-tool/ ►Download Photo to practice: https://www.flickr.com/photos/psdesire/24280268658
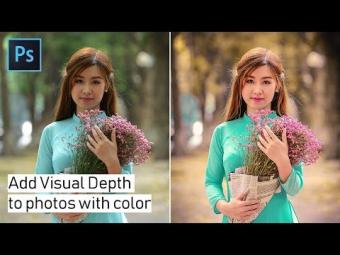
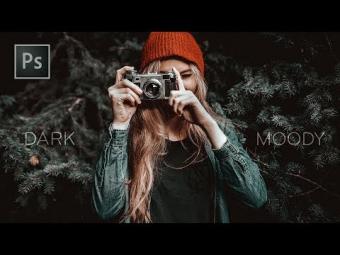
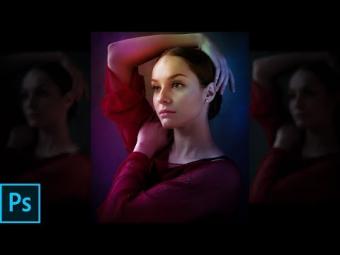
In this photograph there is very less light in the overall scene, especially on foreground subject. When there's not much ambient light to capture then you have 2 choices (photography lighting techniques): create more light yourself while taking shots or take the shot with right camera settings and then post process it. We can selectively apply Exposure, Clarity, Brightness, and other adjustments in the post processing.
Ok lets get started. If you want this photo to practice on, you could download from the link given in the description.
First duplicate background layer CTRL + J and convert to smart object.
Then go to filter menu - select camera raw filter.
For lightroom users, Select a photo to edit in the Library module and press D to switch to the Develop module.
Select the Adjustment Brush tool. choose new to create a new adjustment.
Keep all the settings to zero.
Specify brush size to your preference. Keep Feather,Flow and density to default.
Key ingredient here is Auto Mask. It Confines brush strokes to areas of similar color.
By Enable, it will automatically select where to apply the changes, and where to mask them out.
Now increase shadows value to Recover details in underexposed shadow areas of an image.
Start painting on the subject to make corrections.
To view the mask overlay of the Adjustment Brush tool effect, use the Show Selected Mask Overlay option in the toolbar.
To undo any part of the adjustment, select the Erase brush option, and paint over the adjustment.
Once you're happy with the brush application.
Now Add other necessary adjustments to the effect.
Adjust whites value, to increase the white to a specific area.
Increase Clarity little bit to Add depth by increasing local contrast.
Decrease highlights value to Recover details in overexposed highlight areas of an image.
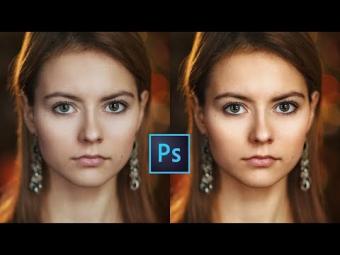
We successfully created an adjustment to lighten a person to make it stand out in a portrait.
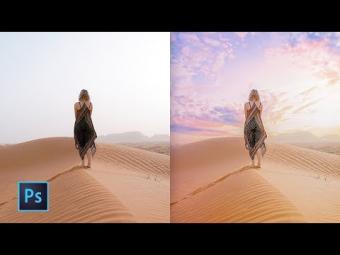
Now similarly enhance the background sky in a photo.
Select new to create a another new adjustment.
Change every setting to zero.
Increase Dehaze amount, it reduces existing haze in a photo and adds blue color to sky.
Now Start painting on the background to make corrections.
Adjust the color temperature to making it cooler.
Add Clarity little.
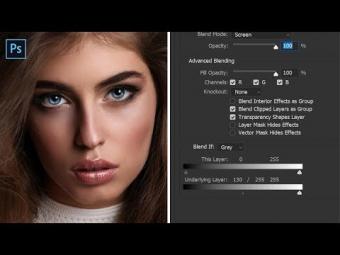
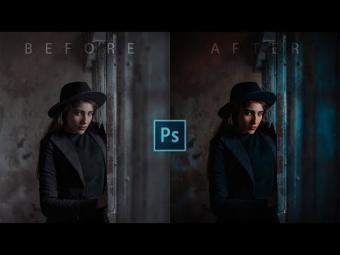
Go to basic adjustments panel. Select effects and add vignette effect to draw viewer attention to the center of the frame.
Once you're happy with the result. Click ok to apply the changes.
Local adjustments are non-destructive and are not permanently applied to the photo.
If you want to make any changes simply double click on camera raw smart filter.
Select adjustment brush. Click on pin to select it.
Change any setting to your preference.
Final step, add color lookup adjustment and select any look from the list to color tone the image.
That's it. We're done. Simple Tips To Get AMAZING Photos RIGHT NOW!
The power of adjustment brush tool in photoshop and lightroom
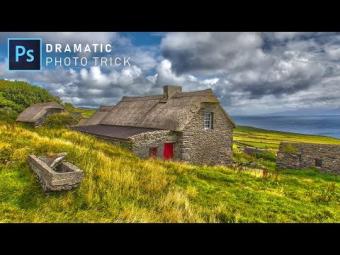
Get The Dramatic Look With Your Landscape Photos!
How to Create STUNNING Photos - Adobe Lightroom cc Landscape Photography Editing Tutorial
►Check out all tutorial here : https://www.youtube.com/photoshopdesiretv/videos
Thanks for watching our free Tutorials! If you enjoyed our video be sure to subscribe to our channel to receive free new videos.
►SUBSCRIBE: https://goo.gl/d31fld
Don't forget to COMMENT, LIKE and SHARE, to get more :)
Follow US - LET'S BE FRIENDS!
------------------------------------------
►Official Website: http://www.photoshopdesire.com
►FACEBOOK : http://www.facebook.com/photoshopdesire
►GOOGLE+ : https://plus.google.com/+photoshopdesiretv
►Twitter : https://twitter.com/PSDesire
►Instagram: https://www.instagram.com/photoshopdesire
Softwares Used:
----------------------------
Photoshop cc 2014, 2015, 2017
Photoshop cs5, cs6,
After Effects cs5
Camtasia Studio
Music:
------------
Inner Light (YouTube Library)
Check Out Our Playlists:
--------------------------------------
Photoshop Tutorials for Beginners, Intermediate and Advanced users
https://www.youtube.com/playlist?list=PLGLEKqTDn233O6PusOR1lEvRwjlErdCYV
Easy, Quick and Fast Photoshop Tutorial Series (NEW)
https://www.youtube.com/playlist?list=PLGLEKqTDn230TS2NzqA2BGblNYZ4NpGWT
HDR Photography Using Photoshop
https://www.youtube.com/playlist?list=PLGLEKqTDn232tlbcBJHNiEPj1h0wPJvVG
Adobe Camera Raw Filter Tutorials and Preset downloads
(same settings steps for lightroom also)
https://www.youtube.com/playlist?list=PLGLEKqTDn233ab_cdALEjtjGASqtTie10
Color Grading or Coloring in Photoshop
https://www.youtube.com/playlist?list=PLGLEKqTDn233uKTZWUFq7GwgNB6BJyM7m
In this photograph there is very less light in the overall scene, especially on foreground subject. When there's not much ambient light to capture then you have 2 choices (photography lighting techniques): create more light yourself while taking shots or take the shot with right camera settings and then post process it. We can selectively apply Exposure, Clarity, Brightness, and other adjustments in the post processing.
Ok lets get started. If you want this photo to practice on, you could download from the link given in the description.
First duplicate background layer CTRL + J and convert to smart object.
Then go to filter menu - select camera raw filter.
For lightroom users, Select a photo to edit in the Library module and press D to switch to the Develop module.
Select the Adjustment Brush tool. choose new to create a new adjustment.
Keep all the settings to zero.
Specify brush size to your preference. Keep Feather,Flow and density to default.
Key ingredient here is Auto Mask. It Confines brush strokes to areas of similar color.
By Enable, it will automatically select where to apply the changes, and where to mask them out.
Now increase shadows value to Recover details in underexposed shadow areas of an image.
Start painting on the subject to make corrections.
To view the mask overlay of the Adjustment Brush tool effect, use the Show Selected Mask Overlay option in the toolbar.
To undo any part of the adjustment, select the Erase brush option, and paint over the adjustment.
Once you're happy with the brush application.
Now Add other necessary adjustments to the effect.
Adjust whites value, to increase the white to a specific area.
Increase Clarity little bit to Add depth by increasing local contrast.
Decrease highlights value to Recover details in overexposed highlight areas of an image.
We successfully created an adjustment to lighten a person to make it stand out in a portrait.
Now similarly enhance the background sky in a photo.
Select new to create a another new adjustment.
Change every setting to zero.
Increase Dehaze amount, it reduces existing haze in a photo and adds blue color to sky.
Now Start painting on the background to make corrections.
Adjust the color temperature to making it cooler.
Add Clarity little.
Go to basic adjustments panel. Select effects and add vignette effect to draw viewer attention to the center of the frame.
Once you're happy with the result. Click ok to apply the changes.
Local adjustments are non-destructive and are not permanently applied to the photo.
If you want to make any changes simply double click on camera raw smart filter.
Select adjustment brush. Click on pin to select it.
Change any setting to your preference.
Final step, add color lookup adjustment and select any look from the list to color tone the image.
That's it. We're done. Simple Tips To Get AMAZING Photos RIGHT NOW!
The power of adjustment brush tool in photoshop and lightroom
Get The Dramatic Look With Your Landscape Photos!
How to Create STUNNING Photos - Adobe Lightroom cc Landscape Photography Editing Tutorial
►Check out all tutorial here : https://www.youtube.com/photoshopdesiretv/videos
Thanks for watching our free Tutorials! If you enjoyed our video be sure to subscribe to our channel to receive free new videos.
►SUBSCRIBE: https://goo.gl/d31fld
Don't forget to COMMENT, LIKE and SHARE, to get more :)
Follow US - LET'S BE FRIENDS!
------------------------------------------
►Official Website: http://www.photoshopdesire.com
►FACEBOOK : http://www.facebook.com/photoshopdesire
►GOOGLE+ : https://plus.google.com/+photoshopdesiretv
►Twitter : https://twitter.com/PSDesire
►Instagram: https://www.instagram.com/photoshopdesire
Softwares Used:
----------------------------
Photoshop cc 2014, 2015, 2017
Photoshop cs5, cs6,
After Effects cs5
Camtasia Studio
Music:
------------
Inner Light (YouTube Library)
Check Out Our Playlists:
--------------------------------------
Photoshop Tutorials for Beginners, Intermediate and Advanced users
https://www.youtube.com/playlist?list=PLGLEKqTDn233O6PusOR1lEvRwjlErdCYV
Easy, Quick and Fast Photoshop Tutorial Series (NEW)
https://www.youtube.com/playlist?list=PLGLEKqTDn230TS2NzqA2BGblNYZ4NpGWT
HDR Photography Using Photoshop
https://www.youtube.com/playlist?list=PLGLEKqTDn232tlbcBJHNiEPj1h0wPJvVG
Adobe Camera Raw Filter Tutorials and Preset downloads
(same settings steps for lightroom also)
https://www.youtube.com/playlist?list=PLGLEKqTDn233ab_cdALEjtjGASqtTie10
Color Grading or Coloring in Photoshop
https://www.youtube.com/playlist?list=PLGLEKqTDn233uKTZWUFq7GwgNB6BJyM7m


YORUMLAR