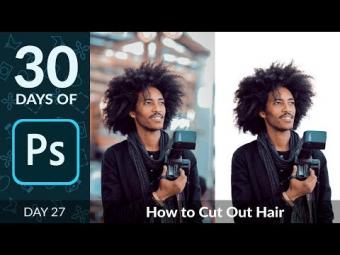
How to Cut Out Hair with the Brush Tool in Photoshop
I Guarantee I Can Teach You to Master Photoshop. Learn How: https://phlearn.com/aaronwillteachyou
How to Cut Out Hair with the Brush Tool
When cutting a person out of their background, hair is often the hardest area to master. Learn how to create custom brushes and use them to cut out hair in today's episode!
Hair Vs. Body
It is helpful to think of cutting a person out in two different parts — the body and the hair. Cutting out a subject's body is relatively easy, though it may take some time. For best results, we recommend using the Pen Tool.
Check Out the Pen Tool Tutorial
https://phlearn.com/use-pen-tool-photoshop
Because hair contains fine detail, it is best done with selection tools or the Brush Tool, as taught in this tutorial.
How to Create a Custom Brush
The first step in cutting out hair is to create a custom brush that looks like a single strand of hair. Everyone has different hair, so each brush is unique to the individual being cut-out.
In this example, we start by creating a single "hair" which is just a brush stroke with a very small diameter to simulate a hair.
Once a single brush stroke is created, it is time to turn it into a Custom Brush Shape. Select the Rectangular Marquee Tool and create a square selection around the hair by holding SHIFT+CLICK-DRAG. Fill the square selection with white and move it behind the layer with the hair on it. Center the hair in the white square by clicking on the Pen Tool, then the Alignment Controls on the top of the screen.
After the hair is centered, keep the selection of the white square active and go to "Edit - Define Brush Preset" and give the brush a name. This will create a brush with the shape of a hair, next it is time to define the custom brush characteristics in the Brush Menu.
Defining Custom Brush Characteristics
To open the Brush Menu, go to "Window - Brush." In this advanced menu, you can control many characteristics of a brush, including shape dynamics, scattering, rotation and size. For best results, mix and match settings to simulate natural hair.
Try adding Size Jitter, Angle Jitter, Scattering, and Roundness Jitter.
Painting Hair on a Layer Mask
After creating the "Hair Brush," it is time to paint on the layer mask to reveal the hair. In this example, we cut out the subject's body with the Pen Tool first, then painted in the hair with the custom brush.
Keep in mind, hair changes size and direction on different areas of the head. The Custom Hair Brush can be rotated in the "Brush Tip Shape" dialog in the "Brush Menu." Change brush size using the open and close brackets "[" "]"
Download the Custom Hair Brush
https://phlearn.com/cut-hair-brush-tool-photoshop
VISIT PHLEARN.COM FOR MORE FREE TUTORIALS
https://phlearn.com
SUBSCRIBE NOW FOR MORE FREE TIPS AND TRICKS
http://www.youtube.com/subscription_center?add_user=phlearnllc
GET FREE TUTORIALS SENT TO YOUR EMAIL + DISCOUNTS ON OUR PRO TUTORIALS!
https://phlearn.com/mail
LET'S BE FRIENDS!
Instagram ► https://www.instagram.com/phlearn/
Facebook ► https://facebook.com/phlearn
Twitter ► https://twitter.com/phlearn
Google+ ► https://plus.google.com/116791098059215639405
Phlearn ► https://phlearn.com
Did you know there is a lot more to PHLEARN than YouTube? https://phlearn.com/more
-~-~~-~~~-~~-~-
-~-~~-~~~-~~-~-
ÖNERİLEN YAZILAR


YORUMLAR