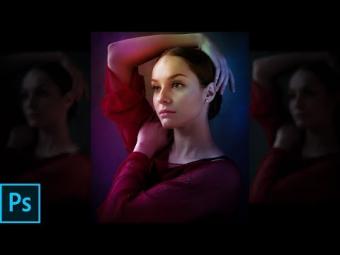
How to Change Normal Person to Model Look-alike in Photoshop - Canon EOS 50D Portrait Retouching
in this retouching tutorial i will show the quickest way to smooth skin like magazine-style finish. How to change or achieve normal photos into high fashion natural looking in photoshop.
►Download PSD file: http://photoshopdesire.com/achieve-high-fashion-natural-looking-skin-photoshop/
►Download Photo: https://goo.gl/nWYdm2
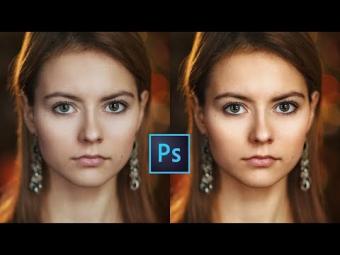
There are a variety of ways to make skin look smooth and bright using Adobe Photoshop. Some methods are quick and easy, while others require a little more care and attention. Here, i’ll give you step-by-step instructions, that will help you handle most skin-retouching circumstances.
For this tutorial, i'm using straight out of camera female portrait which was shot with Canon EOS 50D
Ultimate Skin Retouch Technique in Photoshop - High End Model Look Face Retouching.
Firstly, open your image in Photoshop.
Press ‘CTRL+J’ (on WIndows) or ‘CMD+J’ (on a Mac) to create a duplicate of this layer.
With your new background copy layer selected, right-click and click ‘Convert to Smart Object’.
Next, click on the Filter menu to find the ‘other’ option, and then select "high pass..." to open the High Pass dialog box.
Make sure that the Preview box is checked.
zoom out of the preview image to see the whole thing if you need to.
if we increase the "Radius" value, You will notice halos starting to appear around the edges. That's our key hint. Adjust the Radius until the halos to see.
In this case i'll set the radius value between 25 - 30px.
Click ‘OK’ to apply the High Pass effect.
Now create a new layer from all the visible layers by pressing Ctrl+Shift+Alt+E.
we want to invert this layer 1, so press ‘CTRL+i’ (on WIndows) or ‘CMD+i’ (on Mac) to do so. Or simply go to image menu - adjustments - select invert.
With your new ‘Layer 1’ selected, change its blend mode to ‘Overlay’ from the drop-down menu.
Add inverted layer mask, hold the ALT key and click the ‘Add Vector Mask’ button to add an inverted mask.
With this black inverted layer mask selected, use a soft white brush.
and paint on the skin to bring back the skin-smoothing effect (Retouch Skin Flawlessly).
Then hide the background copy layer to see the result. Before and after.
For a natural effect, You’ll also want to keep quite a lot of the face’s natural details in there, such as fine lines.
So to do that open high pass filter again and lower the radius to 2-3px and change its blend mode to ‘Overlay’.
This method will allow you to retain those details, while providing an attractive glow to the skin.
Now For a truly professional, magazine-style finish. we need to apply color grading.
i will use Color Lookup image adjustment to apply a color scheme. Now you can select any one from a list.
Finally I want to spend some extra time to whiten teeth, Enhance eyes and add some red color to lips. High End Beauty Retouch photoshop tutorial
Go to adjustments and select solid white color. Double click the color fill layer to open the blending options window.
Hold the Alt key and drag the black slider. By doing this we will partially hide the gray portions and achieve a better blending with the teeth.
Now make sure the mask on your color fill layer is selected and then invert the mask.
Grab soft white brush and paint on the teeth to lighten them. Lower the opacity to your preference.
Now add hue and saturation adjustment. Enable colorize option.
Select hue/saturation mask and invert it. Grab soft white brush and paint on the lips.
Start Brushing on her lips slowly. You need to brush very accurately for the best result and for accuracy I suggest you to zoom in a lot.
Adjust hue, saturation and lightness to your liking. Change its blending mode to "soft light. Reduce opacity if you want to minimize the color.
To brighten and enhance eyes, add new blank layer. Take soft white brush and paint below the iris.
go to blur menu - apply gaussian blur. Choose a blur radius that makes the edges smooth & soft then change its blend mode to ‘Overlay’.
Reduce layer opacity to your preference.
And we are done. here is the final image. I hope that you enjoyed this tutorial.
►Check out all tutorial here : https://www.youtube.com/photoshopdesiretv/videos
Thanks for watching our free Tutorials! If you enjoyed our video be sure to subscribe to our channel to receive free new videos.
►SUBSCRIBE: https://goo.gl/d31fld
Don't forget to COMMENT, LIKE and SHARE, to get more :)
Follow US - LET'S BE FRIENDS!
------------------------------------------
►Official Website: http://www.photoshopdesire.com
►FACEBOOK : http://www.facebook.com/photoshopdesire
►GOOGLE+ : https://plus.google.com/+photoshopdesiretv
►Twitter : https://twitter.com/PSDesire
►Instagram: https://www.instagram.com/photoshopdesire
Softwares Used:
----------------------------
Photoshop cc 2014, 2015, 2017
Photoshop cs5, cs6,
After Effects cs5
Camtasia Studio
Music:
------------
Reasons to Smile (YouTube Library)
►Download PSD file: http://photoshopdesire.com/achieve-high-fashion-natural-looking-skin-photoshop/
►Download Photo: https://goo.gl/nWYdm2
There are a variety of ways to make skin look smooth and bright using Adobe Photoshop. Some methods are quick and easy, while others require a little more care and attention. Here, i’ll give you step-by-step instructions, that will help you handle most skin-retouching circumstances.
For this tutorial, i'm using straight out of camera female portrait which was shot with Canon EOS 50D
Ultimate Skin Retouch Technique in Photoshop - High End Model Look Face Retouching.
Firstly, open your image in Photoshop.
Press ‘CTRL+J’ (on WIndows) or ‘CMD+J’ (on a Mac) to create a duplicate of this layer.
With your new background copy layer selected, right-click and click ‘Convert to Smart Object’.
Next, click on the Filter menu to find the ‘other’ option, and then select "high pass..." to open the High Pass dialog box.
Make sure that the Preview box is checked.
zoom out of the preview image to see the whole thing if you need to.
if we increase the "Radius" value, You will notice halos starting to appear around the edges. That's our key hint. Adjust the Radius until the halos to see.
In this case i'll set the radius value between 25 - 30px.
Click ‘OK’ to apply the High Pass effect.
Now create a new layer from all the visible layers by pressing Ctrl+Shift+Alt+E.
we want to invert this layer 1, so press ‘CTRL+i’ (on WIndows) or ‘CMD+i’ (on Mac) to do so. Or simply go to image menu - adjustments - select invert.
With your new ‘Layer 1’ selected, change its blend mode to ‘Overlay’ from the drop-down menu.
Add inverted layer mask, hold the ALT key and click the ‘Add Vector Mask’ button to add an inverted mask.
With this black inverted layer mask selected, use a soft white brush.
and paint on the skin to bring back the skin-smoothing effect (Retouch Skin Flawlessly).
Then hide the background copy layer to see the result. Before and after.
For a natural effect, You’ll also want to keep quite a lot of the face’s natural details in there, such as fine lines.
So to do that open high pass filter again and lower the radius to 2-3px and change its blend mode to ‘Overlay’.
This method will allow you to retain those details, while providing an attractive glow to the skin.
Now For a truly professional, magazine-style finish. we need to apply color grading.
i will use Color Lookup image adjustment to apply a color scheme. Now you can select any one from a list.
Finally I want to spend some extra time to whiten teeth, Enhance eyes and add some red color to lips. High End Beauty Retouch photoshop tutorial
Go to adjustments and select solid white color. Double click the color fill layer to open the blending options window.
Hold the Alt key and drag the black slider. By doing this we will partially hide the gray portions and achieve a better blending with the teeth.
Now make sure the mask on your color fill layer is selected and then invert the mask.
Grab soft white brush and paint on the teeth to lighten them. Lower the opacity to your preference.
Now add hue and saturation adjustment. Enable colorize option.
Select hue/saturation mask and invert it. Grab soft white brush and paint on the lips.
Start Brushing on her lips slowly. You need to brush very accurately for the best result and for accuracy I suggest you to zoom in a lot.
Adjust hue, saturation and lightness to your liking. Change its blending mode to "soft light. Reduce opacity if you want to minimize the color.
To brighten and enhance eyes, add new blank layer. Take soft white brush and paint below the iris.
go to blur menu - apply gaussian blur. Choose a blur radius that makes the edges smooth & soft then change its blend mode to ‘Overlay’.
Reduce layer opacity to your preference.
And we are done. here is the final image. I hope that you enjoyed this tutorial.
►Check out all tutorial here : https://www.youtube.com/photoshopdesiretv/videos
Thanks for watching our free Tutorials! If you enjoyed our video be sure to subscribe to our channel to receive free new videos.
►SUBSCRIBE: https://goo.gl/d31fld
Don't forget to COMMENT, LIKE and SHARE, to get more :)
Follow US - LET'S BE FRIENDS!
------------------------------------------
►Official Website: http://www.photoshopdesire.com
►FACEBOOK : http://www.facebook.com/photoshopdesire
►GOOGLE+ : https://plus.google.com/+photoshopdesiretv
►Twitter : https://twitter.com/PSDesire
►Instagram: https://www.instagram.com/photoshopdesire
Softwares Used:
----------------------------
Photoshop cc 2014, 2015, 2017
Photoshop cs5, cs6,
After Effects cs5
Camtasia Studio
Music:
------------
Reasons to Smile (YouTube Library)


YORUMLAR